
Treat the seam as a complete assembly
Seam sealing tape covers paths where water may leak through a sewn construction. It must suit the fabric surface, seam shape and production process.
A tape that bonds well to a flat swatch may fail at a thick seam crossing. A tape may look smooth but contain a small channel that lets water through.
Bemis notes that even waterproof materials can leak through stitched seams. Its seam-tape range has products for different fabric constructions and stretch needs. Approve the specific assembly of tape and fabric. A general tape description is not enough.
List the fabric, seam, thread and tape in the trial record. State how to apply the tape. Include the finished garment’s intended care and use.
Keep structural seam strength and water sealing as separate requirements. A sewn seam may carry the load while tape seals the holes. Do not assume the tape can carry the seam’s load. That needs a specific design and test evidence.
Identify the surface that the adhesive will touch
Tape selection begins at the bonding face. The outer fabric’s fibre content does not fully describe that face.
A three-layer laminate may present a textile backer to the tape. A coated fabric may present a coating. Other constructions have different inner surfaces.
Record the membrane or coating family where known. Add the inner textile, finishes and any surface treatment. Ask the fabric supplier which tape systems are supported.
Send the actual material to the tape supplier. A catalogue may call the material “polyester waterproof fabric.” That phrase covers many different surfaces.
Framis separates two-layer waterproofing tapes from other tape families. Its product details show why the tape construction must suit the surface it will bond to.
Do not approve a substitute fabric based only on the same face colour and weight. The unseen bonding surface may make the difference between pass and fail.
Keep the fabric lot and side clearly marked. A reversed swatch can produce a misleading trial.
Distinguish the tape’s layers from the garment’s layers
Tape and garment laminates both have layer counts. These counts help selection, but they describe different things.
Ask the supplier to identify the tape’s adhesive side. Ask it to identify the barrier or film and any textile backing too. Record the product code. A short label such as “three-layer tape” is not enough.
Review thickness, flexibility and width. Check performance under the intended care. A tape that seals a heavy shell may feel bulky on a light garment. A flexible tape may be needed where the seam must move.
Bemis lists different backers and stretch characteristics within its three-layer range. One layer count therefore does not define a single performance level. See the manufacturer’s product distinctions.
Request current technical guidance for the exact tape. Do not transfer settings from another product in the same family without a trial.
A proprietary fabric system may require a specific approval or production programme. Check this before buying tape.
Prepare a seam that can be sealed
The tape must follow the seam’s real surface. Bulky folds, uneven allowances and loose threads can make the surface hard to seal.
Review the construction with the sewing team. Identify where allowances lie and how to press or arrange the seam. Check that tape can reach both sides of the stitch zone.
Use ApparelDiary’s garment seam construction guide to coordinate this choice. The sealing plan should be part of the construction decision.
Trim or prepare the seam only through the approved method. Uncontrolled removal of material can weaken the sewn seam. It can also expose a new leak path.
Keep the bonding area clean. Take care not to contaminate it during handling. If cleaning is needed, use a method approved for the fabric and tape. An unsuitable solvent can damage the surface being bonded.
Check that labels, lining pieces and other parts do not enter the seal area by mistake.
A neat seam is helpful. It still needs tests to show that it can be sealed well.
Calculate width from coverage and placement allowance
Tape must cover the potential leak zone. It also needs enough width for a good bond on each side. A shift in position uses some of that margin.
For a simple flat layout, use this planning relationship:
Required tape width = leak-zone width + twice the required side bond + twice the placement allowance
Suppose a hypothetical stitch and needle-hole zone is 8 mm wide. The trial requires at least 7 mm of bonded tape beyond that zone on each side. Placement can vary by 2 mm from centre.
The planning width is:
8 + 2 × 7 + 2 × 2 = 26 mm
A 22 mm tape gives 7 mm per side only when perfectly centred. With a 2 mm shift, one side has 5 mm and the other has 9 mm. The narrow side misses the proposed requirement.
These dimensions are examples, not industry rules. Use trials of the material system and product to set the actual bond width.
Also account for seam height and folds. Tape uses some width to follow a raised seam. A simple projected measurement may then overstate the width left for flat bonding.
Give curves, crossings and ends their own trials
Straight seams are only part of a waterproof garment. Curves, junctions and tape ends can be harder to seal.
Make a seam map showing the construction types. Include hood curves, underarm intersections and pocket corners. Add areas where several seams meet.
At a crossing, the roller must follow a change in thickness. The tape must remain in contact without bridging over a low area. At a curve, one edge follows a longer path than the other.
A setting may pass on a long straight strip. That does not prove it will seal these other features.
Make test pieces that represent each difficult shape. Then check the result on the actual garment. Access and handling may differ there.
Define end treatment and overlaps in the approved method. A wide overlap can still fail. It may bond to an incompatible tape surface or receive too little pressure.
Inspect transitions closely after care. An end or crossing may show early edge lift before the main seam does.
Control the hot-air process as a system
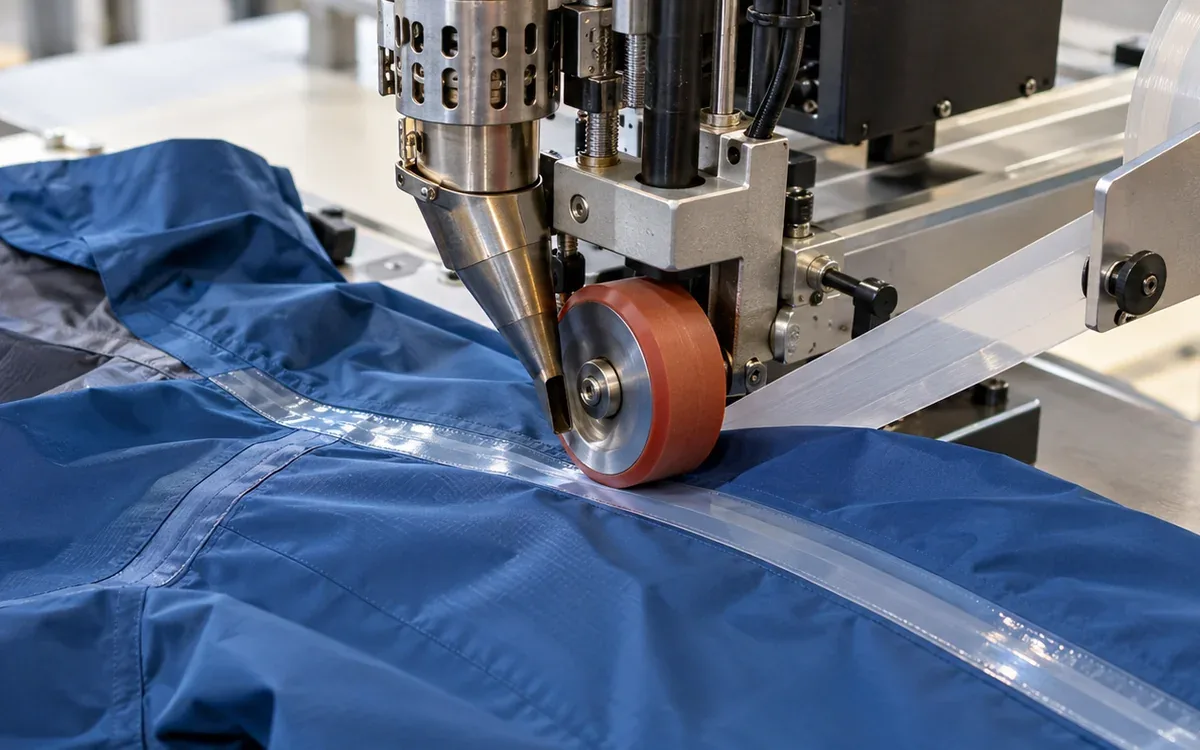
Hot-air taping depends on more than the temperature displayed on the machine. Tape movement, air delivery, nozzle position and roller contact all affect the bond.
Seam Seal International lists nozzle position, temperature, air settings, roller pressure and speed as relevant machine variables. Use guidance from the equipment and tape suppliers that has been validated for the installed system.
The display usually shows a value from one sensor or control point. Do not call it the temperature at the adhesive interface unless it measures that point.
Keep units and measurement locations clear. An air-pressure gauge does not necessarily show the pressure spread across the seam.
Record nozzle and roller condition. A recipe number cannot correct a shifted nozzle, worn surface or blocked air path.
Have authorised staff perform setup and maintenance. Operators need clear steps to follow if heating, feeding or pressure becomes abnormal. They should not keep raising settings to make up for a fault.
Understand why line speed changes the treatment
Speed affects the time available for heating and contact. It also affects how easily an operator follows difficult shapes.
A simple exposure-time calculation helps explain this. Take a hypothetical effective heating zone that is 40 mm long. Tape moves through it at 6 m/min.
Convert speed to millimetres per second:
6,000 ÷ 60 = 100 mm/s
The time through that zone is:
40 ÷ 100 = 0.4 seconds
At 3 m/min, speed is 50 mm/s. Time through the zone is then 0.8 seconds.
This is a geometric explanation only. It does not predict adhesive temperature or set the machine controls. Heat transfer, air conditions and material properties also matter.
A slower pass can change both bonding and surface damage. Slowing down is therefore not always a safe fix for poor adhesion.
Approve speed as part of a process window. Include how the operator handles curves, starts and crossings. Straight-seam speed is only one part of the process.
Check feeding and roll condition
Tape tension and fabric handling can change the assembled seam. This can happen even when heat settings stay fixed. The operator should guide the garment along the approved path. Avoid uncontrolled stretch during feeding.
Mark a defined length on a trial seam before taping. After the agreed cooling and conditioning period, measure it again. Keep the measurement load and method consistent.
Suppose a hypothetical 100 mm marked section measures 97 mm after taping. Its local length change is:
(97 − 100) ÷ 100 × 100 = −3%
That result alone does not identify the cause. Compare three samples. Use an untaped control exposed to the relevant heat, a correctly fed taped sample and the suspect sample. This can help show whether the material shrank or feeding changed its shape.
Check whether the tape itself was stretched during application. A visibly smooth seam under machine tension may change once released. After release, check both sides of the seam for unwanted folds.
Record the tape roll and its storage history. Check the supplier’s shelf-life and packaging requirements. Follow its storage rules for that product. Do not invent one storage rule for all adhesive systems.
Use the approved handling method to protect opened rolls from contamination. Do not add an unlabelled partial roll to a trial meant to qualify a new lot.
Inspect the roll feed path for drag and damage. Check whether the tape releases evenly. A change between the beginning and end of a roll may be a handling issue rather than a change in the fabric.
If a problem follows a roll change, save material from both rolls. Compare it under matched conditions. The supplier then has samples to compare. A report that tape “stopped working” gives less help.
Establish a usable process window
A single successful setting gives limited evidence. Production needs a range that works despite normal, controlled variation.
Ardmel describes compatibility, peel, wash and waterproofness testing as parts of seam-tape development. Its approach supports checking the bond and the finished function together.
Work with the suppliers to choose a trial range. Keep within the equipment and material limits. Record which variable changes and which conditions remain fixed.
Assess appearance, bond behaviour and leak performance for each condition. A strong bond is not enough if the setting damages the laminate.
Repeat the promising condition across separate starts. Use seam shapes that represent production. Test more than one relevant material lot if the production risk calls for it.
Define the limits from the trial evidence. Do not choose the most extreme passing setting just because it gives the highest peel value.
Set an approved range the team can control. It must also be wide enough for reliable work.
Measure peel with a defined method
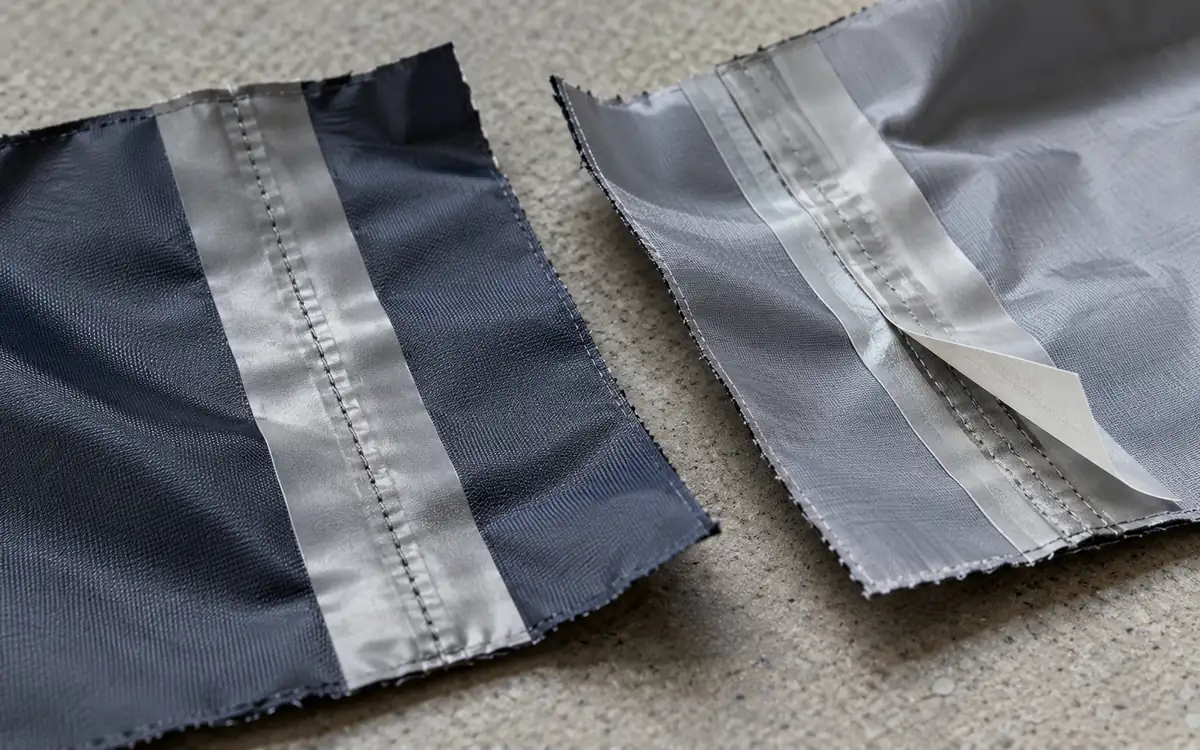
Peel tests can compare how well the tape stays attached. The result depends on specimen width, peel angle and path, and speed. Conditioning and earlier treatment also matter.
ASTM D903-98(2025) covers comparative peel or stripping characteristics of adhesive bonds under defined conditions. Ask the laboratory to confirm that the method suits the proposed assembly.
A buyer or supplier may use a modified seam-tape method. Name it and record the changes. Do not label every hand pull or internal strip test as ASTM D903.
Record the failure mode. Tape may peel cleanly from the surface. Or a coating or laminate layer may tear away with it. These are different failure modes.
Take a hypothetical 20 mm strip. Peel results are 18 N before care and 16 N after care on the same width. Values per millimetre of width are 0.90 N/mm and 0.80 N/mm.
Retention is 16 ÷ 18 × 100 = 88.9%.
This comparison is valid only with matched methods and conditions. It does not set a passing value for all products. Nor does it prove the seam is watertight.
Test water resistance on the seam configuration
Water testing asks if water passes through the assembly under agreed conditions. To assess the seam, include it in the test area.
AATCC TM127 measures fabric resistance to water penetration under hydrostatic pressure. Its public scope states that this result differs from rain or spray results.
When testing a seam specimen, agree its position with the laboratory. Agree how to report any changes from the standard procedure. A seam crossing may need a different specimen layout from a straight seam.
Record where leakage begins. It may occur at the stitch line, tape edge, overlap or surrounding fabric. A leak at the clamp may be a test problem. It does not by itself prove a garment defect.
Use the appropriate test sequence and acceptance criteria for the product. The supplier’s fabric rating does not automatically apply to a sewn and taped garment.
Keep the specimen and photographs of the failure location where useful. They help connect the result to production.
Read peel and leak results together
A strong peel result can occur even when the seam leaks. The tape may be firmly attached over most of its area. A narrow channel could still remain at one crossing.
A low peel result can also appear watertight in an initial test. The bond may separate later during care or use.
The following hypothetical matrix shows why both checks matter:
Trial | Peel requirement | Initial seam water test | Water test after agreed care | Decision |
|---|---|---|---|---|
A | Pass | Pass | Pass | Candidate for further garment approval |
B | Pass | Fail at crossing | Not progressed | Investigate geometry and contact |
C | Fail | Pass | Fail at edge | Investigate bond durability |
D | Pass | Pass | Fail in adjacent laminate | Investigate material damage |
Do not combine these results into a single average. Each requirement addresses a different failure.
Inspect the actual failure surfaces. If the laminate separates, changing the tape alone may not solve the problem. A channel may appear only at crossings. The straight-seam recipe may be sound. The junction could need a different construction or process.
Include care, movement and ageing in the plan
The initial bond is only the starting point. The garment will be folded, worn, cleaned and stored.
Agree suitable exposures with both suppliers, the buyer and the laboratory. They may include repeated care, flexing and stretch. Other conditions may matter to the intended use.
Define the complete care cycle, including drying. “Ten washes” is incomplete without the method and conditions.
After exposure, review both attachment and sealing. Record edge lift, cracking, surface changes and leaks. Check the same difficult shapes used in the first trial.
A small number of laboratory cycles cannot prove a fixed service life. The test supports the stated requirement under its conditions.
Make sure the approved care instruction matches the tested assembly. A later design may use a different tape or lining. Check whether the earlier evidence still applies.
Specialist protective garments need the relevant product standard and certification route. General rainwear trials are not a substitute.
Validate the whole garment
A waterproof seam sample cannot show every way water may enter a finished garment. Closures, pockets, hood design and component junctions also matter.
Gore explains that its waterproof garment system includes construction standards, other qualified materials and garment rain assessment. This shows how a full system is assessed. It does not mean that any taped garment receives Gore approval.
Assess the finished style under a suitable, agreed garment test. Include the relevant sizes and construction variants.
Trace a leak back to its source before changing the tape. Water can travel from an opening and appear elsewhere inside the garment.
Check whether the wearer’s normal movement changes a critical area. A seam that lies flat on a table may fold or stretch in use.
Keep whole-garment results linked to the exact seam-tape route. A development sample may pass its test. That does not support bulk goods made with different tape or an unrecorded repair.
Control production through representative checks
Plan production checks around the approved process and the product’s risk. Include first pieces, relevant changes and routine checks.
Record fabric and tape lots, machine identity and recipe version. Add operator or shift details. Keep the record practical enough to use.
Check tape position and surface condition before the garment leaves this step. A missed edge is easier to address before lining or later assembly hides it.
Use test seams that represent production for any required destructive tests. A flat control strip is not enough if crossings pose the main failure risk.
State which changes need review. These may include a new tape, fabric backer or seam allowance. Machine maintenance or a new nozzle and roller layout may also need checks.
Avoid treating a stable display as proof of a stable process. Record both the operating conditions and the resulting seam.
Diagnose a failure before adding more heat
Use the failure location and surface evidence to guide the investigation.
Observation | Checks to prioritise |
|---|---|
Tape lifts cleanly from the fabric | Surface compatibility, contamination and activation |
Coating separates with the tape | Fabric-layer integrity and process damage |
Leak follows a seam crossing | Bulk, roller contact and tape bridging |
Leak appears at a tape end | End treatment, overlap and local activation |
Tape wrinkles on a curve | Geometry, feeding and tension |
Face fabric shows shine or distortion | Thermal exposure, pressure and material limits |
Good initial result fails after care | Material pairing, bond development and care route |
Use these prompts to guide checks. They do not prove a cause.
Do not repeatedly reheat an unqualified assembly. Extra heat can change both the tape and laminate.
Preserve failed specimens and compare them with accepted samples. The failure mode often tells more than the final number alone.
Qualify repair separately
A repair adds another process to material that has already been treated. It needs its own limits.
State whether to leave, remove or cover the old tape. Check that the repair materials suit the surface they will actually touch.
Trial the repair on defects that represent the affected pieces. Assess the repaired geometry, appearance and water resistance after the required care.
Record all earlier processing as well as the repair. A garment may have had several local heating passes. Do not treat it as equal to a first-pass piece without evidence.
Define when repair is permitted and when the garment must be rejected. Keep repaired pieces traceable through final assessment.
A high repair rate should trigger review of the main process. The ability to repair is useful. It should not hide a poor match between tape and construction.
Frequently asked questions
Will a wider tape always solve leakage?
No. Width can improve coverage. It cannot fix an incompatible adhesive. Nor can it close a channel at a crossing where contact is poor. It may also add stiffness.
Does a high peel value prove waterproofness?
No. Peel and leakage measure different features. Test both under the agreed conditions and review the failure location.
Can the same setting be used on all colours?
Only if the material system and trial evidence support that range. A colour change may also involve a different finish or lot condition. Confirm what changed.
Is the machine temperature the adhesive temperature?
Not necessarily. Identify what the sensor measures. Test the bond through the complete process. Do not assume the display directly measures the adhesive interface.
Release a tested seam system
Approve seam sealing tape as part of a specific fabric, construction and process. Check coverage, bond durability and water resistance at difficult features. Then assess the whole garment.
Keep the approved materials, operating window and test evidence connected. This gives production a clear basis for repeating waterproof seams.
References
Bemis: Three-layer seam tapes and substrate distinctions.
Framis: Two-layer waterproofing seam tapes.
Seam Seal International: Hot-air sealing machine variables.
Ardmel Technical Solutions: Adhesive and seam-tape testing.
ASTM D903-98(2025): Peel or stripping strength of adhesive bonds.
AATCC TM127: Water resistance under hydrostatic pressure.
Gore: Finished-product technology and waterproof garment assessment.


Discussion0
Loading the discussion…