

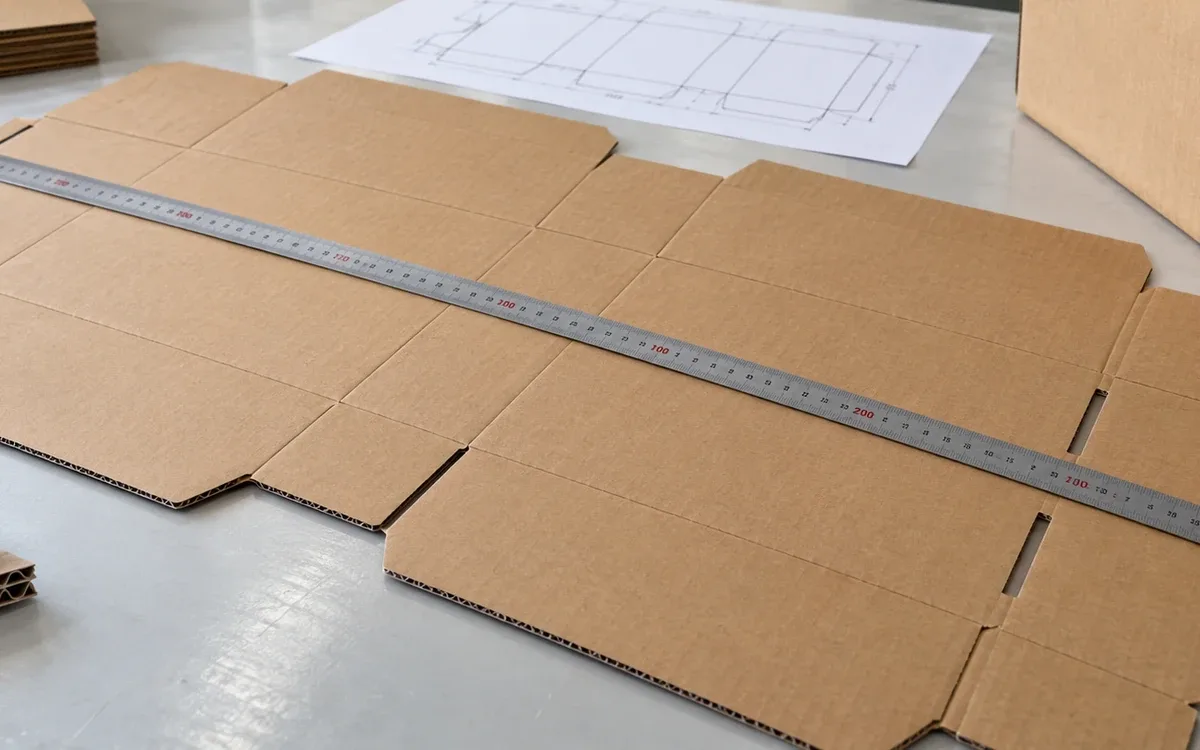
Begin with the developed carton
A carton measuring 600 × 400 × 300 mm is not made from a sheet with those dimensions. It needs four side panels, top and bottom flaps, and a joining area. It also needs production allowances. The board consumed is therefore larger than the visible surface around the packed garments.
Carton board consumption starts with the flat blank. For an early estimate, a simple formula can describe the geometry of a regular slotted case. For a purchase order, the approved cut-and-score drawing should control the calculation.
Give each area a clear name. The cut blank is the board retained after cutting. Its envelope is the rectangle around that blank. The purchased sheet area is the material bought for production. Slots and cutouts explain part of the difference. Sheet margins and layout explain another part.
This guide focuses on corrugated board quantity and conversion cost for garment cartons. The worked examples use hypothetical inputs. These include dimensions, yields, prices, and material values. The calculations support a purchasing estimate; they do not establish a carton strength requirement.
Confirm the carton style and dimensions
A style code makes communication more precise. The FEFCO code provides an internationally used system for corrugated packaging designs. It identifies the construction. Add the dimensions, material grade, and production allowances to complete the specification.
A regular slotted case is commonly identified as FEFCO 0201. GWP's description shows a one-piece case with a manufacturer's joint and closing flaps. Other styles can have quite different material requirements.
State whether the carton dimensions are internal, external, or score-to-score. Internal size describes the available space. Outside size includes the board and folded construction. Score dimensions locate folds in the flat blank.
These values are related but are not interchangeable. Board thickness, scoring, fold direction, and joint design influence the developed drawing. A general instruction to “add one centimetre” cannot cover every board and style.
FEFCO Recommendation 101 addresses internal dimensions of flap-type or one-piece cases. Use the agreed measurement basis when checking samples. Check how the supplier measured the case. An internal measurement cannot be compared directly with an outside measurement.
Build a preliminary 0201 area estimate
For a simple idealized regular slotted case, let:
L = nominal body length.
W = nominal body width.
H = nominal body height.
J = assumed manufacturer's joint allowance.
First ignore board thickness and score allowances. The four panels then extend around a perimeter of 2(L + W). For this ideal geometry, add the top and bottom flap depths. Their combined depth is approximately W.
A preliminary rectangular envelope is therefore:
Envelope length = 2(L + W) + J.
Envelope height = H + W.
Envelope area = [2(L + W) + J] × (H + W).
This is a planning model, not a production dieline. The actual joint may occupy only part of the rectangle. Slots or trimmed corners remove more material. The rectangle still helps estimate a sheet allocation before a final drawing exists.
Use one unit throughout. Are all dimensions in millimetres? The area result is then in square millimetres. Divide it by 1,000,000 to get square metres. If they are in centimetres, divide square centimetres by 10,000.
Never divide a linear dimension by an area conversion factor. Keeping the unit beside each calculation catches this mistake.
Work through an early area estimate
Assume a hypothetical carton with L = 600 mm, W = 400 mm, H = 300 mm, and J = 35 mm.
Envelope length = 2 × (600 + 400) + 35 = 2,035 mm.
Envelope height = 300 + 400 = 700 mm.
Envelope area = 2,035 × 700 ÷ 1,000,000 = 1.4245 m².
For 500 cartons, this preliminary envelope total is:
500 × 1.4245 = 712.25 m².
That result includes no separate sheet trim, setup sheets, or production rejects. It also omits the exact allowances needed to turn the nominal carton into the real blank.
For comparison, the surface area of a closed rectangular box is:
2 × (LW + LH + WH).
Using the same nominal dimensions gives 1.08 m². That smaller number misses flap overlap and joining requirements. It is therefore unsuitable as the purchasing consumption for this carton.
A three-dimensional volume calculation is also irrelevant to board area. The carton volume describes space. The blank area describes material. Both calculations start with length, width, and height. That shared starting point does not make their results interchangeable.
Replace the estimate with the approved blank
Suppose the converter approves a developed drawing. Its rectangular envelope measures 2,050 × 716 mm.
Approved envelope area = 2,050 × 716 ÷ 1,000,000 = 1.4678 m².
For 500 blanks, the envelope total becomes 733.9 m². The increase from the preliminary estimate is 21.65 m² across the order.
Inspect the drawing differences before judging the converter's figure. Score allowances, flap gaps, joint geometry, and board construction may explain them.
Ask the converter to identify the dimensions used for billing and material planning. A finished blank with cutouts may have less retained board than its rectangular envelope. Both figures are useful if they are clearly named.
For example, suppose the approved CAD drawing reports 1.4200 m² of retained board. This is the area left after slots and trims. The difference from the 1.4678 m² envelope is 0.0478 m² per blank. The removed board was still bought as part of the sheet. Only a layout that avoids those areas can avoid buying them.
Keep the drawing revision beside both figures. A flap, hand hole, or joint may change later. Update the drawing and calculation together. Do not rely on a supplier's verbal note.
Read the board grade without multiplying area twice
Corrugated board combines flat liners with fluted medium. A single-wall board has one fluted layer between two liners. A double-wall board adds another medium and a further liner. GWP's board guide describes these structures and the use of paper grammage.
Suppose a supplier quotes one square metre of finished three-ply board. That square metre already includes its component papers. Do not multiply the carton area by three before applying that finished-board price.
The same principle applies to a five-ply or seven-ply finished board. Ply count describes the construction. It does not multiply the billed area of combined board.
When buying component papers instead, their quantities must be calculated separately. Each flat liner follows the board area. The fluted medium uses more paper length because of its corrugated path.
Record liner grades, medium grades, flute profile, and the finished-board requirement. A label such as “five-ply carton” leaves too much undefined for a meaningful comparison.
Avoid using mass alone to judge performance. Two boards can weigh the same yet perform differently. Check paper properties, flute geometry, bonding, and conversion quality. The consumption estimate should preserve the approved material specification.
Convert component grammage into board mass
Grammage is mass per unit area, usually g/m². For a flat liner, its contribution to one square metre of board is its stated grammage. For a fluted medium, multiply its paper grammage by its take-up factor.
The take-up factor is the medium length required per unit length of combined board. The US EPA's corrugated-container example demonstrates this principle. Its example factor is not a universal value for every corrugator or flute profile.
A simplified single-wall model is:
Board grammage = outer liner + inner liner + medium × take-up factor + other retained mass.
Assume the following hypothetical inputs:
Component | Assumed value | Contribution |
|---|---|---|
Outer liner | 150 g/m² | 150 g/m² |
Inner liner | 125 g/m² | 125 g/m² |
Medium | 112 g/m² at factor 1.43 | 160.16 g/m² |
Retained adhesive allowance | 9 g/m² on the stated basis | 9 g/m² |
Total | — | 444.16 g/m² |
Use a consistent moisture and mass basis. The adhesive entry should not confuse wet application mass with retained solids. Actual finished-board measurement remains the practical check.
For double-wall board, add all three liners and each medium multiplied by its own factor. Do not apply one take-up factor to the flat liners.
Distinguish blank mass from purchased sheet mass
Using the illustrative finished-board grammage of 444.16 g/m², the 1.4678 m² envelope represents:
1.4678 × 444.16 = 651.938048 g.
The retained cut blank of 1.4200 m² represents:
1.4200 × 444.16 = 630.7072 g.
The difference is about 21.23 g of board per blank. It corresponds to the assumed removed areas.
These figures are estimates. A finished carton may include extra joint adhesive, tape, and print. Add their mass if the board basis does not already include it. Condition and moisture can change the measured mass.
If a supplier sells sheets by area, use the purchased sheet area and its rate. If it sells by mass, confirm what the mass includes and how it is determined. Mixing a retained-blank mass with a gross-sheet price basis can hide waste.
Keep the calculations linked but separate. The retained blank helps describe material in the final carton. The purchased sheet determines what the converter must source. The finished carton weight is useful for a physical check.
Do not make a precise mass claim from an approximate board grammage. State the basis and round to match the quality of the inputs.
Lay out blanks on the actual sheet
A blank that fits by area may not fit by shape. Two 1.4678 m² envelopes have a combined area of 2.9356 m². Their dimensions still need to fit within the available sheet.
Suppose a hypothetical sheet is 2,100 × 1,460 mm. Two envelopes of 2,050 × 716 mm can fit in the assumed orientation. Confirm that the converter's required margins and spacing also fit.
Sheet area = 2.100 × 1.460 = 3.066 m².
Envelope layout yield = 2.9356 ÷ 3.066 × 100 = about 95.75%.
The remaining area covers the assumed sheet margins and unused space outside the envelopes. Slots within each envelope remove more board. A later yield may already include all cut waste. If so, do not count the slots again.
Flute direction constrains the layout. DS Smith's specification guidance defines its sheet dimensions. It explains which dimension follows the flute and which is the chop length. Confirm the converter's convention and the approved direction in the carton.
Rotating a blank may improve area utilization but change its structural orientation. A purchasing calculation cannot authorize that change. The approved drawing and performance requirement control the allowable layout.
Plan the sheet quantity and production allowance
Continue the hypothetical two-blank layout. The order needs 500 accepted cartons. Assume a planning yield of 98% after the blanks reach the relevant converting stage.
Required blank attempts = 500 ÷ 0.98 = 510.204.
Round up to 511 planned blank attempts. With two blanks per sheet, at least 256 production sheets provide 512 positions.
Assume four further sheets are required for setup. Total planned sheets are:
256 + 4 = 260 sheets.
Purchased board area = 260 × 3.066 = 797.16 m².
This plan assumes a certain yield. It does not guarantee that 260 sheets will deliver 500 accepted cartons. Actual variability and the agreed supply allowance still matter.
Define what the 98% covers. If it already includes setup sheets, do not add four again. Does it include sheet-edge trim? If so, applying the separate envelope layout yield would count that loss twice.
The cleanest method follows physical stages. Start with the number of blanks needed. Use a valid layout to convert that number to sheets. Add each stage's losses once. Keep reserve stock separate from expected consumption.
Cost the approved material and conversion
Assume the hypothetical purchased board rate is 0.62 currency units per m². Use the 797.16 m² input from the sheet plan.
Board cost = 797.16 × 0.62 = 494.2392.
Assume conversion and printing cost 0.18 per accepted carton, and a separate setup charge is 45. These are teaching assumptions, not market rates.
Conversion and printing = 500 × 0.18 = 90.
Total included cost = 494.2392 + 90 + 45 = 629.2392.
Cost per accepted carton = 629.2392 ÷ 500 = about 1.2585.
This total covers only the listed material and conversion items. Check what the actual quote includes. Ask about jointing, print plates, special coatings, inserts, and packing. Confirm any other required feature too.
If the supplier quotes finished cartons at a unit rate, its internal board waste may already be priced in. Use the consumption model to understand the quote, not to add every internal cost a second time.
For transport and delivery costs, see ApparelDiary's guide to packaging decisions and landed cost. The material model remains focused on the board and conversion boundary.
Resolve quotation differences before choosing a rate
Consider two hypothetical offers for the same order. Supplier A prices 500 cartons using the approved board and drawing. Supplier B offers a lower total but lists only “five-ply, brown.” The second offer is incomplete, even if the dimensions look familiar.
Ask for the paper and flute structure and the drawing revision. Confirm the print scope and included finishing work. Confirm whether a loose top or bottom pad is included. A pad is a separate part with its own area. A corrugated outer case does not always need one.
If the approved pack needs two rectangular pads, each 590 × 390 mm, their combined area is:
2 × 0.590 × 0.390 = 0.4602 m² per set.
For 500 sets, that is 230.1 m² before the pad cutting allowance. Calculate this part separately. It may use another board grade and a different sheet layout. Do not just add its area to the outer-carton blank and use one price. That could hide both differences.
Also confirm the number of printed faces and the artwork revision. A plain and a printed carton can use the same board area. Their conversion costs may still differ. Do not assume that every cost rises in direct proportion to square metres.
Check the manufacturer's joint in the real sample
The joint connects the developed strip into the case. Its position, width, and fastening method belong on the drawing. Do not reduce it solely because the area calculation shows a saving.
Check the joint position against the approved design. Does it interfere with the contents or closure? Inspect both in the sample. Check the erected case for squareness and consistent panel alignment. The envelope dimensions may be correct. A twisted joint can still make the case hard to assemble.
Some allowances serve the production process. Others remain in the final joint. Record them separately. A machine may require a feeding margin that is later trimmed. Include that margin in sheet consumption. It does not increase the finished joining area.
Compare design changes on the same basis
A small dimensional change can alter both blank area and sheet yield. The effect is not always a smooth percentage.
Suppose a revised blank becomes slightly taller. Two blanks may no longer fit the selected sheet with the required margins. Even if retained board rises only a little, purchased board per carton could rise sharply.
The reverse can occur when a modest reduction permits a better layout. Ask the converter to show the layout for each proposed design. A lower blank area may reduce purchased board. The percentage saving need not be the same.
Hold unrelated inputs constant when comparing options. Use the same board grade, price date, order quantity, and yield assumptions. Change an input only if the proposal calls for it.
Then test the affected requirements. A shorter flap must still close correctly. A narrower joint must still form a sound case. A different flute direction needs an appropriate review. Material savings are useful only after the revised carton meets its intended function.
Explain each cost change. Is it due to less retained board, better sheet layout, a different material, or fewer rejects? This makes the proposed saving auditable.
Verify samples before relying on the estimate
Erect a sample from the approved drawing. Check internal dimensions, squareness, flap closure, joint position, and the intended garment pack. Confirm that the carton closes without forcing the contents or distorting the case.
Check the flat blank as well. Use the agreed method to check the blank. Measure the envelope, score positions, slot widths, and joint geometry. The external size may be correct while the inside space is wrong. The flaps may also be hard to close.
The FEFCO testing and recommendation catalogue lists tests for different properties. These include basis weight, compression, and bursting. Board area and ply count cannot substitute for the required performance evidence.
Use the approved product specification to select the checks. Do not impose a single universal burst or compression limit on every garment carton.
Keep storage conditions in view. DS Smith's storage guidance explains that humidity and temperature affect corrugated board. It recommends protection and suitable storage conditions. State the sample condition when comparing mass. A damp carton may weigh more without containing extra paper.
Check the revision on the estimate and carton sample. Both should match.
Close the job with a material reconciliation
Record the issued sheets. Reconcile them against accepted cartons, scrap, returned sheets, and work in process. Count sheets and blanks separately when one sheet provides several blanks.
Record why material was lost. Classify setup sheets, print defects, and damaged edges separately. Add poor slotting and joint failures as distinct causes. Each may need a different fix. A single waste percentage may conceal the one cause that changed.
Check the billable unit against the receiving record. If board arrives by square metre, check the sheet dimensions and count. Use those figures to calculate the area. If it arrives by weight, confirm tare and the contractual measurement basis.
A heavier delivery does not by itself prove higher paper grammage. First account for moisture and accessories. If a material difference is suspected, use the agreed test method and representative samples.
Use actual results to update the next estimate. First check that the construction and process are comparable. A successful long run may have a lower setup burden per carton than a short printed order.
Preserve the final drawing, board specification, layout, and result together. Those four records explain consumption far better than a detached formula.
Frequently asked questions
Is carton consumption the same as box surface area?
No. The developed blank includes flaps, overlaps, and a joint. The purchased sheet may also include margins and cut waste. The outside surface area of the erected box misses those features.
Should I multiply the blank area by the ply count?
Calculate component paper areas separately if that is the purchasing basis. Flat liners follow the combined board area. Each fluted layer also needs its own take-up factor. A simple ply-count multiplier would miss that extra paper. A price per square metre of finished corrugated board already includes its layers.
Can one allowance cover every carton size?
A past waste percentage may help with an early budget. It should not replace the actual drawing and layout. Check sheet fit, setup needs, and process yield for this job. Size, style, board, and print needs can change each one.
Does a higher board mass prove a stronger carton?
No. Performance depends on several factors. These include material properties, flute geometry, direction, bonding, conversion, and conditions of use. Retain the specified performance requirements while calculating material quantity.
Which area should appear in the costing sheet?
Show each relevant area. Name the retained blank, envelope, and purchased sheet areas clearly. Identify the area used for the price calculation. Clear names prevent two correct but different figures from becoming a dispute.
Build a consumption estimate that can be checked
Use the carton style and approved drawing to establish the blank. Use the board specification to establish its material basis. Use a valid sheet layout and defined losses to establish purchasing quantity.
Then compare the estimate with the actual sample and the completed job. This links the costing sheet to the converter's production plan. Both teams can then explain every square metre purchased.
References
FEFCO: International packaging design code.
FEFCO: Testing methods and recommendations.
FEFCO Recommendation 101: Internal dimensions of cases.
DS Smith: How to specify corrugated board.



Discussion0
Loading the discussion…