
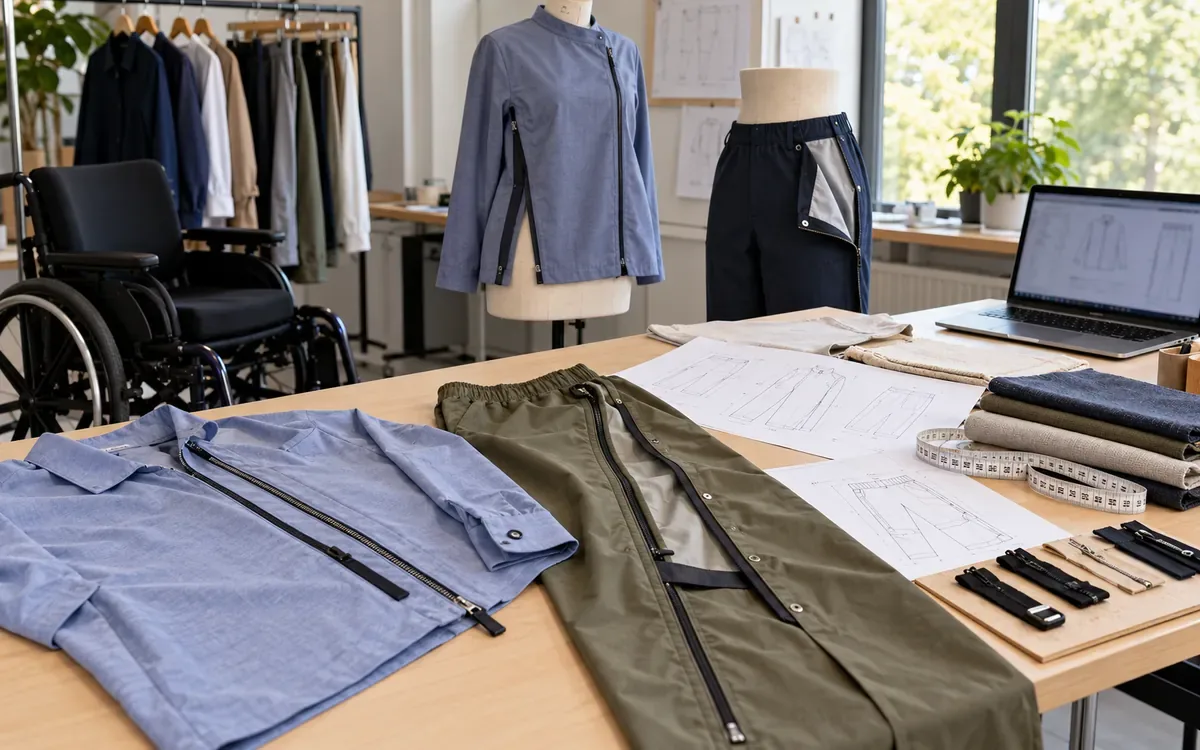
Seated adaptive clothing works when its shape, openings, and details suit the person who will wear it. A long zip can help someone reach a closure. It cannot correct a waistband that cuts into the abdomen, a pocket trapped under a thigh, or a jacket that catches on a wheel. The design must connect these parts into one usable garment.
Start with the person and the task. Who is dressing, and where? Which seated postures matter? What does the wearer want to look like? Then develop and test the garment in that setting. This guide turns those answers into a practical process. It covers measurements, patterns, trials, and production decisions.
What seated adaptive clothing needs to solve
Adaptive clothing includes garments changed to make dressing or wearing them more accessible. Seated design is a specific task within that wider field. It may serve someone who dresses alone, someone who uses help for part of the process, or someone whose needs vary through the day. A wheelchair user should not be assigned an assisted dressing garment simply because they use a wheelchair.
Research supports treating clothing as part of participation and personal choice. A study reported by Seton Hall University surveyed people with mobility impairments. Clothing barriers affected their work, social activities, and daily events. Its findings describe the study sample; they do not define every wheelchair user's needs. The design implication is to ask what the wearer wants to do in the garment. Kabel and colleagues, 2017.
An office shirt, a wet weather coat, and trousers for home use will have different priorities. An office shirt may need a tidy front when seated at a desk. A coat may need access to a chair control. Trousers may need an opening that supports the wearer's chosen dressing routine. Do not combine every possible feature into one style. Extra fasteners can add bulk, weight, maintenance, and decisions.
Write the brief with the wearer
Invite users into the work before the first pattern is approved. Ask them to show the difficult step, describe a good garment they already own, and name features they dislike. Offer a choice about recording or photographing the session. Record a preference as a preference, not as a rule for a diagnosis.
A recent co-design study involved female wheelchair users in China. It considered ease of dressing, seated fit, and identity together. The useful lesson for product teams is that function and appearance belong in the same brief. Its findings reflect a particular population and setting, so they need local validation. Jiang and colleagues, 2025.
Use a short task table to make each requirement testable. The following is a proposed development worksheet, not a standard test method.
Task | Question for the wearer | Evidence to collect |
Put on the garment | Which step needs help or repeated effort? | Sequence, pauses, assistance requested |
Close the front | Can the closure be reached and aligned? | Hand used, reach path, failed attempts |
Sit at a desk | Does the front fold or press where it is unwanted? | Wearer feedback and marked fit areas |
Use chair controls | Does fabric cover or catch on a control? | Observation in the intended chair |
Reach and turn | Does the hem or waistband move out of place? | Movement, displacement, comfort report |
Use pockets | Can an item be placed and removed while seated? | Access with the usual item and hand |
Remove the garment | Can the wearer repeat the process when tired? | End-of-session trial and feedback |
Ask which tasks matter most. A garment that takes slightly longer to close may still be preferred if it looks right, stays in place, and avoids unwanted assistance. Set acceptance criteria with the wearer instead of ranking independence by speed alone.
Measure the posture that the garment will serve
A standing size chart is a useful starting reference, but it does not describe the whole seated body. One study involved 246 adult male wheelchair users with spinal cord injury. The researchers found several groups of seated body shapes. This supports checking proportions rather than assuming all users share one seated shape. It does not justify applying that study's groups to children, women, or all wheelchair users. Seated body shape study, 2026.
Use defined landmarks and repeatable methods. ISO 8559-1:2017 provides anthropometric definitions used in clothing size work. Its public scope confirms that purpose. The team should add posture and equipment details to its seated measurement sheet. Trained staff should use the full relevant method when needed.
Record the chair, cushion, back support, footwear, and usual underlayers. Ask the wearer to adopt their normal posture. Do not force a symmetrical pose just to make a form look tidy. If asymmetry affects the fit, record it with consent. Then review the options: a stock style, an adjustment, or an individual alteration.
Useful measurements may include seated waist, hip, and thigh girths. Record the back and front waist levels too. Check the knee position and the distance from waist to intended hem. For tops, check back width during reach and arm movement. Assess sleeve length in use. Locate the front hem above the lap. Record body dimensions separately from finished garment dimensions.
Take a repeat measurement when a result is unclear. Mark the exact route of the tape on the worksheet. A difference caused by a new landmark is not body change. Keep the measurements private and give the wearer control over how images are used.
Develop a seated block instead of adding random length
The central pattern task is balance: where the garment's length and volume sit around the body. Raising a trouser back can help coverage, but the whole waist, seat, crotch, and thigh relationship still needs a trial. Shortening a jacket front can reduce lap bulk, but may also change pocket position and the look of the closure.
Build from a documented block. Keep the unaltered version, then record each change and the reason for it. Each pattern stage has a role. ApparelDiary explains these in its guide to blocks, working patterns, and production patterns. Keep the seated fitting record with the working pattern. Later edits should preserve each agreed feature.
For trousers, evaluate the waistband at the front, sides, and back in the normal seated posture. Check whether the crotch area allows the intended movement without hanging in unwanted folds. Follow the leg down to the knee and ankle. A hem that looks correct while standing may sit differently over a bent knee, footwear, or foot support.
For a shirt, assess arm reach before making the whole body larger. A study of shirts for female wheelchair users examined armholes, sleeve caps, and plackets as parts of a seated design. That is a useful reminder to locate the restriction before changing circumference. Shirt structure study, 2025.
Use temporary seams or a simple toile for the first changes. Ask the wearer to perform agreed movements, then mark where the cloth pulls and where it gathers. Change one main cause at a time. Otherwise, an improved second sample will not tell the team which edit worked.
Calculate ease and overlap without creating false precision
Ease is the difference between a garment dimension and the body dimension it serves. The right amount depends on fabric behaviour, garment purpose, layers, shape, and preference. A percentage from one product is not a universal seated fit rule.
Consider a hypothetical woven overshirt. The agreed seated body girth at a defined level is 104 cm. The first trial garment measures 114 cm at that same level when closed, excluding its overlap. The team wants to describe the sample, not claim an ideal allowance.
Ease = finished garment girth − body girth
Ease = 114 cm − 104 cm = 10 cm
Ease percentage = 10 ÷ 104 × 100 = 9.62%
The 10 cm is total circumference ease. It is not 10 cm on each quarter of the pattern. The result also says nothing about where the ease sits. A broad back and narrow front can still produce the same total girth. Yet that garment may feel very different during reach.
Now suppose two back panels on a separate trial style together span 68 cm at a marked horizontal line. The required closed span between the outer edges is 58 cm. The simple flat geometry gives 10 cm of overlap:
Overlap = combined panel span − closed span = 68 − 58 = 10 cm
If movement requires the covered span to reach 62 cm, the nominal overlap falls to 6 cm. This calculation assumes flat panels at the same level. It excludes drape, body curvature, fastener placement, and twisting. It is therefore a planning check. Check actual coverage on the wearer during the agreed movements. Specify seam allowances separately.
Choose openings around a complete dressing sequence
Watch the sequence from the garment's starting position to its final fit. A closure that is easy to pull can still be hard to start. A large opening can still fail if a sleeve must pass through a painful or restricted movement. Break the task into locating, reaching, aligning, gripping, closing, and checking.
Commercial adaptive ranges show several options. Examples include side openings, pull loops, open backs, and longer zip pulls. These are design possibilities, not evidence that one closure suits a named condition. Silverts' self dressing guide is a useful view of available feature types.
Closure option | Development advantage to investigate | Trial question |
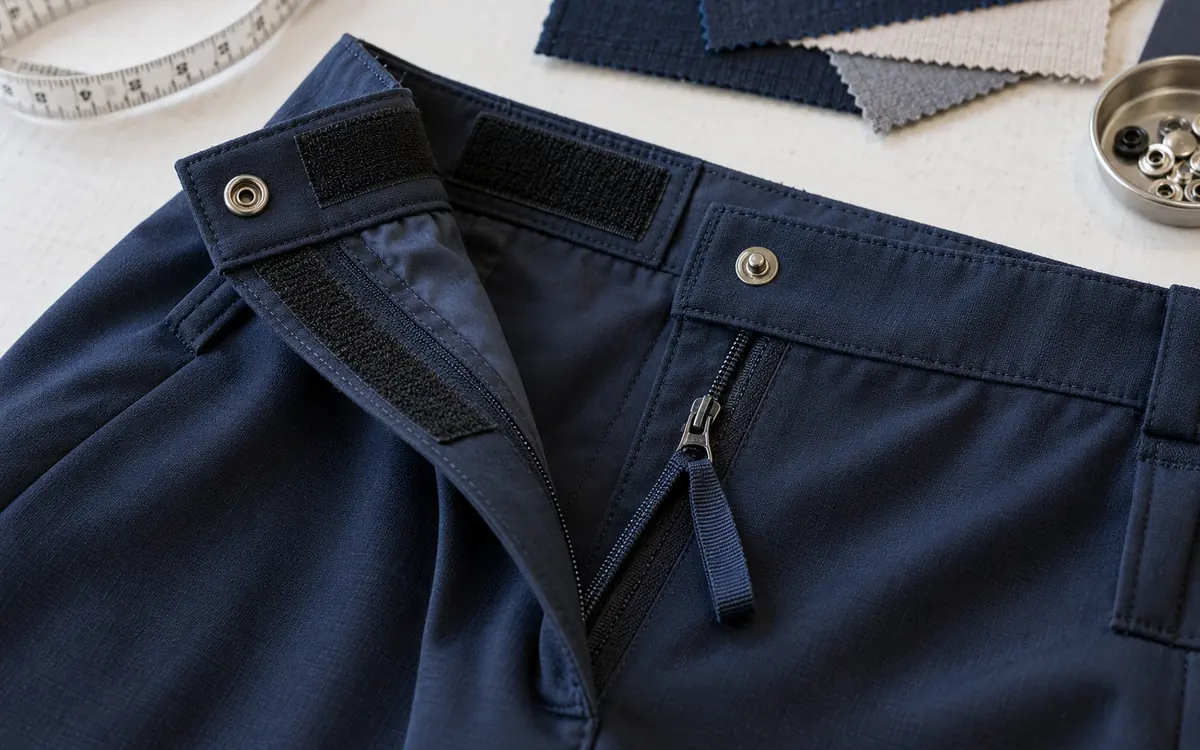
Zip with an accessible pull | A larger grasp area can be provided | Can the wearer start and release it? |
Hook and loop | Closure position can be adjusted | Is the peel action, sound, and contact acceptable? |
Snap | Distinct closed position | Can the wearer align and press it without unwanted force? |
Elastic pull-on opening | No separate fastening sequence | Can the opening pass over the body in the chosen routine? |
Side opening | Can open a larger part of the garment | Is it reachable and clear of chair hardware? |
Magnetic closure | Alignment may be easier in some designs | Is it appropriate for the wearer and any medical devices? |
Magnets need a specific decision. The FDA explains that strong magnets in some consumer products can affect implanted medical devices. Its public advice on phones and watches is not a garment certification rule. If the design uses magnetic fasteners, identify their location. Follow the implant maker's advice with the wearer and relevant clinician. Offer a suitable option without magnets. Do not treat a generic distance as proof that a garment is safe. FDA guidance.
Position any pull loop so it helps the intended grip without trailing into moving chair parts. Test the actual component on the actual fabric. A loose fastener sample held in the air cannot show how a zip behaves when the garment is under tension.
Place pockets, seams, and labels with purpose
Map the contact areas in the intended seated position. Then review bulky seam crossings, pocket bags, labels, rivets, and fastener backs. The aim is to improve comfort and usability. Clothing changes alone must not be presented as treatment or proof of pressure injury prevention.
A thigh pocket may be easy to see but hard to reach under a desk. A side pocket may sit beside a wheel or under an armrest. Make a simple pocket mock-up and trial it with the usual phone, keys, or card holder. Ask the wearer to retrieve the item without changing to a posture they would not use in daily life.
For seam choice, compare the finished thickness, flexibility, and location. A neat flat sample may become bulky where four layers meet. Test that junction, not just a straight seam. Once the contact map is clear, review the seam options. ApparelDiary's guide to garment seam construction can support that choice.
Labels also need thought. A removable label may help one person but leave another without care details. Consider a soft placement, a clearly readable print, or a separate durable care record. Check that the chosen solution still meets the rules in the intended market.
Select fabric through paired garment trials
Do not use fibre names as shortcuts for comfort or stretch. Compare actual fabrics in the garment construction. One knit may recover well after dressing yet become bulky at a folded placket. A woven fabric may hold a formal shape
but require more opening area. Surface feel, stretch direction, recovery, weight, and wash response all deserve a place in the trial record.
Prepare two samples with the same main shape. Vary one important fabric choice between them. Ask the same wearer to use each for the same tasks where practical. Record what changed: ease of pulling on, sleeve movement, bunching, warmth, surface feel, or care effort. Preferences can differ between users without either response being wrong.
Test the proposed wash process before closing the specification. Recheck fit, overlap, closure action, and seam feel after care. A prototype that works once is not enough for a garment that will be washed repeatedly. Use the care process the product team can support and the wearer can reasonably perform.
Run a useful wear trial
Explain the trial, gain consent, and agree that the wearer can pause or stop. Let them choose whether a helper is present. Never ask a participant to perform an unsafe transfer or change a clinical routine to demonstrate a garment.
Separate first impressions from task results. A participant may like the appearance yet dislike a closure. Record both. Use neutral questions such as “What happened when you reached forward?” rather than “Was the new sleeve better?” Ask what they would change before presenting the team's preferred explanation.
For a small development trial, keep individual records. An average can hide a serious failure for one person. The following hypothetical results compare the same four wearers using an existing shirt and a prototype. Times cover the agreed closing task only, in seconds.
Wearer | Existing shirt | Prototype | Difference |
A | 90 | 60 | 30 |
B | 120 | 85 | 35 |
C | 75 | 70 | 5 |
D | 105 | 80 | 25 |
Mean existing time = (90 + 120 + 75 + 105) ÷ 4 = 97.5 s
Mean prototype time = (60 + 85 + 70 + 80) ÷ 4 = 73.75 s
Reduction in mean time = (97.5 − 73.75) ÷ 97.5 × 100 = 24.36%
The mean task time fell in this invented trial. The result is not an average of the four individual percentages. It does not prove a benefit across the wider population or a gain in health. Order, practice, fatigue, and assistance can affect results. A real trial should record them and alternate garment order where practical.
Keep separate columns for completion, help requested, comfort, and preference. If wearer C needs more effort despite a five-second saving, revise the design. Do not allow a speed average to overrule the wearer.
Turn approved samples into a dependable specification
Once the design works, document the parts that make it work. Include the seated fit reference and finished measurements, with tolerances. Define the opening dimensions and overlap checkpoints. Add fastener positions, pull details, and critical seam junctions. Add clear photographs or drawings to the internal production pack with the wearer's consent where relevant.
Distinguish a design target from a production tolerance. A target describes the intended product. A tolerance describes allowed manufacturing variation around it. Do not enlarge a tolerance simply to accept a sample that no longer meets the use case.
Check size range limits. A closure within reach on the central size may move too far away on a larger or smaller size. Review overlap, pocket access, and sleeve reach at the ends of the range. Keep the approved pattern changes linked to each size and record the wearer groups still untested.
Inspect finished garments for the critical functions. Confirm that openings release fully, fasteners are secure, edges do not snag, and the specified overlap is present. Plan a practical wash check on production materials. A late fabric substitution should trigger review of the features that depended on stretch, recovery, or thickness.
Plan repairs without losing the adaptive function
An accessible feature can become a single point of failure. If a wearer relies on a particular pull loop or opening, a small broken part may make the whole garment unusable. During development, ask how that part will be repaired and whether an ordinary repair shop can identify the right replacement.
Consider a hypothetical side-opening trouser. The wearer has approved a particular zip pull because they can locate it by touch. A later repair replaces it with a smaller metal tab. The zip still opens, so a conventional repair check passes. The garment has nevertheless lost the feature that made it usable for that person. Describe the approved grasping feature in the specification. State which function any replacement must preserve.
Keep spare components where practical, and provide a clear repair contact or instruction. Check how the closure can be replaced. Would the repair cut through a critical panel or change the opening length? Avoid putting the only care information on a removable part that is likely to be discarded during repair.
Give customer service a short fault description form. Ask what task has become difficult, whether the problem began after care or repair, and which component is affected. Do not ask customers to disclose a diagnosis to report a broken fastener. This feedback can reveal repeated design failures and help the team improve the next production run.
Common problems and focused corrections
Observed problem | What to examine first | A useful next trial |
Shirt pulls across the back during reach | Back distribution and sleeve geometry | Alter the restricted zone before adding all-around width |
Trousers gather at the front waist | Front rise, waistband position, and seated balance | Compare marked toiles in the usual chair |
Closure works on a table but fails when worn | Fabric tension, reach, and starting action | Trial the component in a complete placket |
Pocket is difficult to use | Seated hand path and surrounding hardware | Move a temporary pocket before changing the pattern |
Coverage is lost when turning | Panel overlap and anchor location | Measure coverage through the agreed movement |
Sample changes after washing | Material and component response | Repeat fit and closure checks after the proposed care cycle |
Treat these as starting points for investigation. The same visible fault can have more than one cause. Review the wearer's explanation before deciding that a pattern edit is the answer.
For example, a wearer may be able to reach a pocket yet struggle to take out a phone. Start the trial with the phone inside, in the chair the person normally uses. Observe the whole action, from finding the opening to bringing the phone into view. Moving the pocket closer might help reach but place the phone against a chair part. A deeper pocket might hold it securely but make grasping harder. Mark two temporary positions and ask the wearer to compare them. Record the chosen location with the phone size and chair context, so the next sample preserves the reason for the change.
Questions product teams often ask
Is a larger regular garment enough?
Sometimes a person prefers a regular garment in a different size. That choice should be respected. Extra width solves only some fit problems. It may leave seated length, reach, opening access, or pocket placement unchanged. Compare the chosen regular garment with the proposed adaptive sample in actual use.
Must adaptive clothing look different?
No. Visible features are a design choice. Some wearers want discreet changes; others value distinctive details. A systematic review examined disability and apparel research. It discusses gaps in our understanding of people's needs and experiences. Use that wider evidence to support user involvement, then let the wearer define the desired appearance. Systematic review.
Can one sample approve the whole size range?
It can approve only what it demonstrates. Use the sample to learn, then check the range and key user groups. A stock range may not meet every need. Explain how a wearer can seek an alteration. Do not promise universal fit.
What should the product page explain?
Describe the opening, closure, and seated shape in plain terms. Give the measurements and intended dressing method. Show how the garment is used. Avoid implying that a diagnosis determines the correct size or that a feature guarantees independence.
Make the wearer the final judge of usefulness
Good seated adaptive clothing joins practical access with fit, appearance, and choice. Start development with real tasks. Measure the relevant posture and test complete garments. Carry the agreed details into production. Calculations help describe ease, overlap, and trial results. They support the fitting conversation; they do not replace it. A successful garment is one the wearer can use, trust, and choose to wear again.
Adaptive design depends on fit measurement, so see how to measure garments, the garment specification sheet and designing a garment collection.
References
Jiang and colleagues: Co-design and adaptive clothing needs of female wheelchair users in China.
Seated body shape typology of male wheelchair users with spinal cord injury.
ISO 8559-1:2017, anthropometric definitions for body measurement.
Evaluation and optimisation of shirt structure design for female wheelchair users.
Silverts: Self dressing guide and adaptive closure examples.
Discussion0
Loading the discussion…