
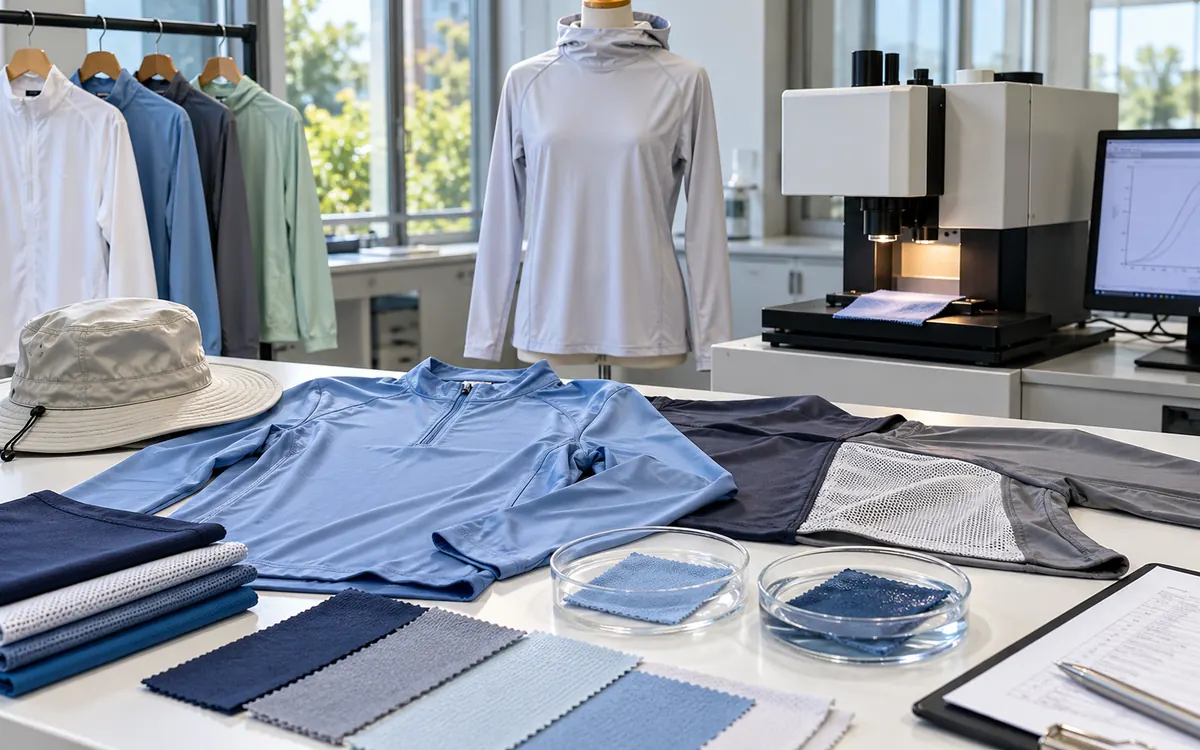
A high ultraviolet protection factor is a useful fabric result. It does not ensure a good sun protective garment. Sleeves can ride up. A mesh insert can sit over exposed skin. A fitted panel can stretch far beyond the state tested in the laboratory. Good UPF clothing design connects the fabric result to coverage, fit, use, care, and the claim on the label.
The product team needs to ask a practical question. Does the garment give the intended protection when people wear it? This guide explains how to build that question into development. It includes a simple UPF calculation and a coverage exercise. It also sets out a test plan and a way to control production changes.
What UPF measures
UPF describes UV protection under a defined textile test. The result uses erythemally weighted radiation. Each wavelength has a different ability to cause skin redness. “Erythemally weighted” means the calculation gives each wavelength a weight for that effect. The rating is a ratio. A higher number means less weighted radiation passes through in that test. AATCC TM183 measures UV transmission or blocking through fabric. It has procedures for dry or wet specimens. AATCC TM183 public scope and principle.
UPF does not describe the amount of skin a garment covers. It is also not a promise that a person can stay outdoors for a stated number of hours. The user's exposure also depends on location and UV conditions. The wearer, activity, exposed skin, and other forms of protection still matter. ARPANSA advises using clothing as part of a broader sun protection approach. ARPANSA clothing guidance.
Keep three questions separate during development. What happened to the tested material? What areas does the garment cover in use? What claim is supported under the selected standard and market rules? A fabric report can help answer the first question. It cannot settle the other two by itself.
Read the rating in the context of its standard
Keep the standard name and edition beside the result. Add the test condition to that record. A number without that context is hard to compare. A dry, relaxed swatch describes one state. A report that includes wetting, stretch, or specified ageing covers other states. Compare like with like.
ARPANSA explains the classes in AS/NZS 4399:2020. It lists minimum protection at UPF 15 and good protection at UPF 30. UPF 50 or 50+ gives excellent protection under that scheme. It also explains that the standard addresses coverage and labelling. These classes belong to that scheme. Do not mix them with a different table from an older guide. ARPANSA standard guidance.
Document | Main role in a development plan | What it does not replace |
AATCC TM183(2020)e | Instrumental UV transmission or blocking test | Finished garment design review |
ASTM D6544-25 | Defined preparation before UV transmission testing | A guarantee of every user's service life |
ASTM D6603-19 | Labelling specification for UV protective textiles | Care and fibre content obligations |
AS/NZS 4399:2020 | Evaluation and classification, including coverage and label provisions | A market-specific review of the whole product |
The ASTM public scopes show these different roles. D6544 describes exposures intended to simulate seasonal use. D6603 uses instrument data as the basis for labelling. Other label duties still apply. Public summaries help with planning. The lab and product team need the full relevant documents to apply the detailed rules. ASTM D6544-25 and ASTM D6603-19.
Understand the arithmetic without inventing a certification result
For teaching purposes, imagine the UV spectrum divided into only three bands. Real tests use the prescribed wavelength intervals, equipment, weighting data, and calculation rules. The following invented example explains the ratio; it is not a substitute test.
Give each band a normalized weight. This is its share of the incoming, erythemally weighted radiation. The weights add to one. Let transmission be the fraction passing through the sample in that band.
Hypothetical band | Normalized weight | Transmission fraction | Weighted transmission |
A | 0.20 | 0.03 | 0.006 |
B | 0.50 | 0.02 | 0.010 |
C | 0.30 | 0.01 | 0.003 |
Total | 1.00 | — | 0.019 |
Illustrative UPF = sum of incident weights ÷ sum of weighted transmissions
Illustrative UPF = 1.00 ÷ 0.019 = 52.63
The illustrative weighted transmission is 1.9%. The corresponding blocked fraction is 98.1% in this simplified model. Do not average the three separate band ratios. The bands contribute different shares of the incoming radiation. The figure 52.63 is not ready for a product label. Sampling, statistical, classification, and design rules still have to be applied.
A simpler relation helps explain the scale. The weighted transmission fraction equals one divided by UPF. UPF 25 corresponds to 4% and UPF 50 to 2% in that ratio. The second value halves the transmitted fraction; it does not double the area of skin covered. Keep this distinction clear when writing product copy.
Build the brief around the activity
Before sourcing fabric, describe the planned use. A loose walking shirt and a close fitting swim top face different conditions. Write down the expected movements and wet exposure. Note the underlayers, care method, size range, and climate. Mark the areas intended to cover skin from the sun. Mark any openings that will remain too.
Consider a paddling top. Check arm reach and shoulder stretch. Check the coverage between the top and lower garment too. For a gardening shirt, it might focus on bending, rolled cuffs, collar use, and long wear. These are examples of design questions, not prescriptions for a particular protection class.
Ask whether the user is likely to change the intended configuration. A collar may cover the neck only when fully raised. Make that limit clear in the product description. A zip that is usually worn open changes the front coverage. Make the useful configuration comfortable and clear enough that people will choose it.
Document tradeoffs at the brief stage. The team may want large air vents. Check how those openings affect the sun coverage claim. If it wants a very close fit, plan how stretch will be measured and addressed. Resolve such conflicts early. Changes are easier before the team locks the patterns, trims, and fabric orders.
Map coverage on a moving garment
Review coverage on the body, not only on a flat drawing. Mark the neckline, sleeve ends, front opening, side vents, hem, and any mesh or cut-out areas. Then inspect the garment during the movements in the brief. Photograph or draw the coverage zones consistently, with the fit model's consent.
Use the smallest and largest intended sizes as part of the range check. Grading can change a sleeve opening, neckline, or overlap in ways that a central size does not reveal. Check relevant body proportions within the target group. One fit model cannot represent the whole market.
The following worksheet is an original design review tool. It is not a standard's coverage classification form.
Area | Static check | Movement check | Decision to record |
Neck and upper chest | Collar and opening position | Bend, look down, turn | Coverage in stated wearing configuration |
Shoulder | Panel and insert coverage | Reach forward and overhead | Stretch and any opening created |
Wrist | Cuff position | Reach and grip | Sleeve displacement and user adjustment |
Waist | Hem overlap with lower garment | Bend and sit | Any newly exposed skin |
Back vent | Outer flap and inner layer | Arm movement and airflow | Whether exposed areas need another design |
Lower leg | Hem and side opening | Sit, step, kneel if relevant | Intended coverage remains clear |
Record failures in precise terms. For example: “During the agreed reach, the left sleeve moved 4 cm above the marked wrist line.” A vague note such as “coverage poor” gives the pattern maker little to work with. Record the exact size, model, fabric, and garment version.
Why a small uncovered area deserves attention
A simple model shows why the team needs to check both fabric rating and coverage. Assume a flat target area receives uniform UV exposure. Ninety-five percent is covered by a material with illustrative UPF 50. The remaining 5% is fully open. Ignore edges, reflected radiation, angle, folds, and body geometry.
Relative transmitted fraction = covered fraction ÷ UPF + uncovered fraction
Relative transmitted fraction = 0.95 ÷ 50 + 0.05 = 0.069
The model gives 6.9% of the incident weighted radiation across the whole target area. If the entire area were covered by the same material, the simple model would give 2%. The exposed area drives much of the difference.
Do not call the reciprocal of 0.069 a garment UPF rating. This is an original example of coverage. It is not a recognized garment test. It does not estimate a person's health risk. Real skin exposure is uneven. A small opening may deserve more attention than a small gain in fabric rating. That is the lesson of this model.
Use the lesson to compare practical changes. A longer overlap that stays in place may solve a real coverage gap. A heavier fabric may leave the gap unchanged. Fix the main design problem first. The correct choice still requires wear trials and the applicable standard's design assessment.
Treat stretch as a local condition
A garment does not stretch evenly. The shoulder, elbow, seat, knee, or chest may experience more strain than a loose side panel. Evaluate the areas that carry the greatest extension in normal use. ARPANSA notes that stretching a knit can open spaces in its structure and reduce its UPF. That is a reason to investigate the product, not a fixed reduction factor for all knits. ARPANSA factors affecting protection.
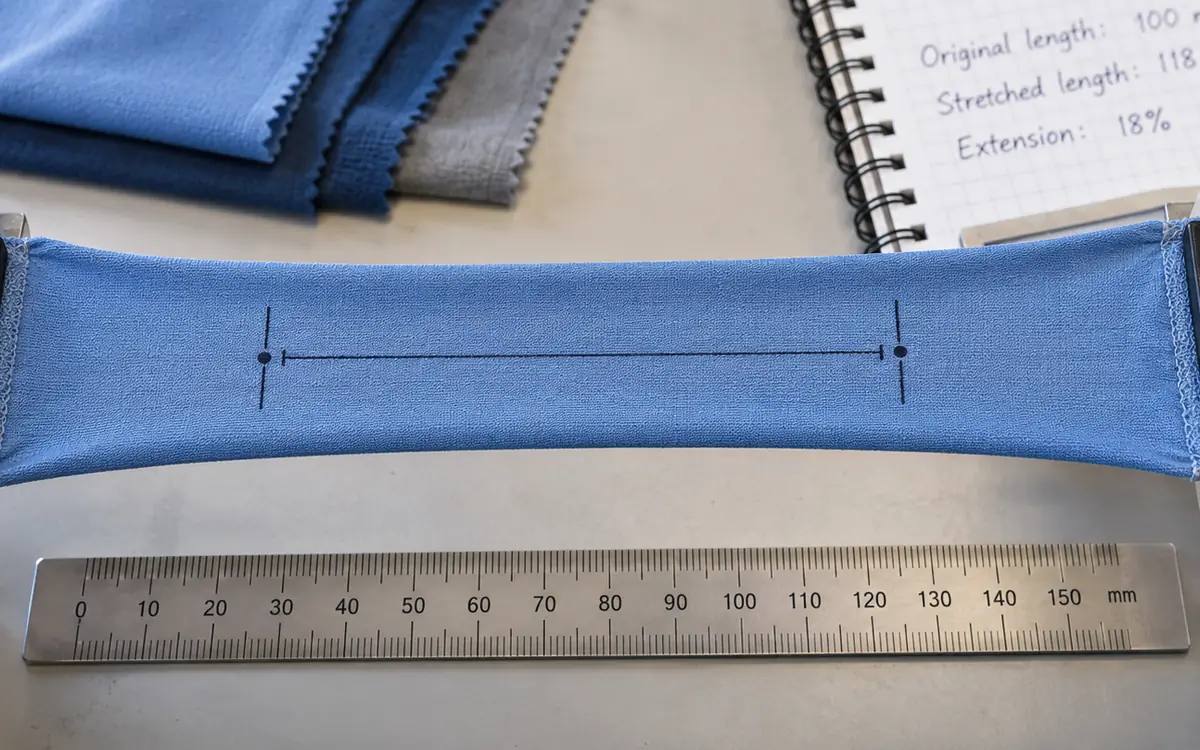
Here is a simple development check. Mark two points 100 mm apart on a trial panel. Suppose the chosen movement takes those points 118 mm apart. The extension in that direction is 18%.
Extension = (loaded length − initial length) ÷ initial length × 100
Extension = (118 − 100) ÷ 100 × 100 = 18%
This describes one measured line, not the whole panel's two-dimensional strain. Record the direction and test posture. The lab may need its own defined stretch fixture or method. That test may differ from this garment check. Discuss how the observed condition will be represented before ordering tests.
Avoid solving stretch only by adding a larger size. Shape, movement allowance, panel orientation, and fabric construction may offer better options. Recheck coverage after each change. A looser garment may reduce tension. It can also change the openings and drape.
Wet use and care need their own questions
Do not assume a dry result proves the performance of a wet product. One original study examined cotton and cotton/Coolmax plain knits. It looked at wetting and stretch together. Its results showed that the studied combinations could lose protection under those conditions. That result applies to those samples and test conditions. It does not give a fixed loss for every fibre blend. Study of wet and stretched knitted fabrics.
Define the use condition in the request to the laboratory. Swimming, sweat, repeated pool exposure, and ordinary washing are different questions. Ask which standard procedures apply. Would extra development tests help? Agree on their purpose first. Label a custom trial as such in the report. Keep it separate from the formal classification test in the technical file.
Ageing also needs care in interpretation. ASTM D6544-25 describes several ways to prepare samples. They involve laundering, simulated sunlight, and chlorinated pool water. These steps help estimate changes after seasonal use. This preparation has a defined purpose. It cannot guarantee that every garment lasts two calendar years. ASTM preparation practice.
A product's care instructions should match the tested and validated route. If the intended care changes, review the claim evidence. Care wording also needs product evidence. ApparelDiary's care label validation guide explains that broader process.
Write a test matrix before cutting samples
A clear matrix prevents expensive testing that misses the main risk. List material, colour, print, finish, condition, and garment zone. Ask the laboratory how many specimens are required and how results will be reported. Do not guess sample counts from a general online article.
Development question | Proposed comparison | Evidence needed |
Does the chosen fabric meet the intended claim? | Exact production material | Applicable laboratory result and classification basis |
Could colour affect the result? | Selected colour variants | Documented sampling rationale and results |
Is a contrast panel equivalent? | Main fabric and insert | Separate evidence for materially different areas |
What happens during close fit? | Relevant relaxed and stretched states | Method, direction, extension, and result |
Is wet use part of the product? | Required dry and wet conditions | Defined preparation and laboratory method |
Does care change performance? | Before and after specified preparation | Traceable care or ageing record |
Does the garment cover as intended? | Size and movement trials | Design review with the required standard provisions |
The matrix should name an owner for each question. The fabric mill may supply test data. The brand must connect those data to the exact material and garment it sells. A report may cover “similar polyester.” That does not establish a result for a new construction, finish, or colour.
ARPANSA describes its accredited testing service. It explains why a lab measurement is needed to establish UPF. Use an appropriate laboratory's current submission instructions for the samples and reporting route. ARPANSA clothing and fabric testing.
Read the report as a product developer
Match the report to the purchase specification. Check material code, construction, colour, finish, batch, and sample condition. Confirm that the method and edition match the agreed plan. Ask the lab about any unclear result. Check the reported value, class, uncertainty, and limits.
Keep raw instrument values separate from the final rating. A single high specimen result may not be the report's approved claim. Do not round upward, average unlike materials, or select only the strongest colour. Follow the applicable method and classification rules rather than creating a brand-specific shortcut.
If an unexpected result appears, first verify identity and preparation. Were the specimens taken from the intended lot? Was a print or finish missing? Was the sample tested under the agreed condition? Then investigate material causes. Define the question before repeating the test. Another number may add little if it answers the wrong question.
Keep a record for each sample. Link the report, retained material, and approved garment. A future team should be able to find the evidence. It should not have to rely on someone's memory. Keep the supplier's technical statements alongside the independent reports. Label the different roles of these sources.
Control production changes that affect the claim
Build a short change review into the purchase process. Check changes to fabric construction, mass, yarn, dye, print, or finish. A change of supplier needs review too. Decide whether the existing evidence still applies. The right response depends on the change. An unchanged fibre label is not a reason to skip the review.
Treat inserts and trims according to their function and location. A decorative mesh panel over skin is different from a label inside an opaque pocket. Map the changed part to the coverage plan. If the intended protective area has changed, update both the design review and the test plan.
Agree on a plan for repeat orders with the lab and supplier. Define how to select samples and trace them to each lot. Do not promise that one retained swatch proves every future lot. Record accepted variation and the conditions that require further review. Connect any corrective action to the affected batches and product claims.
The production specification should include the approved garment configuration. A later cost saving might remove an overlap, shorten a sleeve, or change a vent. Such edits change the garment's function. Review them as design changes. A material test result does not approve those pattern edits.
Follow one design change through the evidence
Consider a hypothetical outdoor shirt that has passed its planned fabric tests. The development sample has a solid upper back and an overlapping lower vent. Before production, a buyer asks for a mesh yoke because it looks lighter. The factory offers a mesh described as the same fibre blend as the main fabric.
Start by marking the new yoke on the coverage drawing. It sits over skin, so the change affects an intended protective area. Next, identify the exact mesh construction and ask what UV evidence exists for it. Both fabrics may contain polyester. That does not make the main fabric's report valid for the mesh. Ask the wearer to reach forward. Check how the outer and inner layers sit. Has the overlap changed?
There are several possible outcomes. The team could keep the original yoke or find another suitable fabric structure. It could redesign the vent. It might test and assess the new design so the revised product has enough evidence. The choice depends on the evidence and the intended claim. It should not depend on whether artwork has already been printed.
Record the decision against the style version and update the approved sample. Purchasing, production, and marketing can then follow the same record. Each team can see what was approved and why.
Balance sun coverage with a garment people will wear
Coverage that users reject in practice will not deliver the intended design. Trial comfort, movement, appearance, and ease of care alongside the protection work. Ask what users actually do when they become warm. They may roll sleeves, open the front, or leave the garment behind.
Test proposed ventilation features as complete constructions. An overlapping vent differs from an exposed mesh strip. Assess its coverage in its own right. A shaded fold does not inherit the main fabric's lab rating. Nor does air permeability predict UPF. Each claim needs relevant evidence.
Use small, focused prototypes. Compare two cuff shapes in the same fabric. Another trial could compare two fabrics in the same pattern. Record whether the improvement changes the protective configuration. Better comfort is valuable. It still needs to sit beside a supported UV claim.
Include realistic care and storage in user trials. Ask whether the garment dries in time for the next use and whether fasteners remain easy to operate. These questions connect the design to daily routines. Keep the findings separate from lab results. Neither should become a promise the evidence cannot support.
Keep labels and product descriptions precise
Describe the claimed rating, applicable scheme, and wearing conditions accurately. Explain the coverage rather than implying that all exposed skin is protected. Get the exact required wording from the relevant documents. Have it reviewed before use. Web summaries are not enough to create a legal label.
ARPANSA explains how to obtain its own UPF tags. The route includes testing and a separate tag process. A favourable report is one step. The brand also needs permission to use an agency's mark in the chosen way. Follow the scheme owner's current conditions. ARPANSA labelling service.
Check each phrase against the evidence. Claims such as “blocks every UV ray” or “safe all day” overreach without support. So can “permanent protection.” Explain how to wear and care for the garment. Give users a way to ask about changes. A repair, replacement panel, or new care method may affect the supported claim.
Questions about UPF clothing design
Can a dark colour replace testing?
No. Colour is one of several factors that can affect protection, but it does not establish a rating. Test the actual material and relevant variants under the chosen scheme. A colour name is not an optical measurement.
Can two layers have their UPF numbers added?
Adding labels is not a valid way to rate an assembly. Layers change transmission, spacing, stretch, and coverage. Does the claim depend on several layers? Have that assembly assessed under an appropriate agreed method.
Does an unrated garment provide no protection?
No. Lack of a rating means the user does not have that particular verified claim. Many fabrics reduce UV transmission. Keep a missing test result separate from a measured one. Do not assign a number by appearance.
What should be fixed first after a failed trial?
Identify the failure. A material result, a coverage gap, and a label mismatch need different corrections. Use the test plan to find the missing evidence. Change the part at fault. Repeat the checks affected by that change.
Design the protection into the whole garment
Start UPF clothing development with a clear use case. Link the fabric to its test result, then check coverage, local stretch, wet use, care, and production changes. The final claim should reflect all of that work.
Before release, put the approved sample beside the test report and the proposed product page. Follow one claim through all three. If the page promises a sleeve feature that the sample no longer has, the wording needs correction. If the sample has a new panel, the report may need review. This small handover check helps catch a mismatch that separate teams can each miss. The garment and its claim should tell the same story.
Sun-protection claims need testing and labelling, so see light fastness testing, care label validation, colourfastness to washing and the garment specification sheet.
References
AATCC TM183(2020)e: UV transmission and blocking test method, public scope and principle.
ARPANSA: Sun protection using clothing.
ARPANSA: AS/NZS 4399:2020 guidance for consumers and manufacturers.
ASTM D6544-25: Preparation of textiles before UV transmission testing.
ASTM D6603-19: Labelling of UV protective textiles.
Effect of stretching on UV protection of cotton and cotton/Coolmax knitted fabric in a wet state.
Discussion0
Loading the discussion…